Git CLI
Getting and Creating Projects
init
git init

git init --bare <repo>
# 从裸仓库 clone 下来的本地仓库可以进行正常的 push 操作, 但是从一般仓库 clone 下来的本地仓库却不行。 这也正是裸仓库存在的意义。
# 裸仓库一般情况下是作为远端的中心仓库而存在的。
clone
Basic Snapshotting
status
add
git add .
git add <文件名>

git add -i # 打开交互式子命令

git add -p # 直接进入交互命令中的patch模式
# y:接受修改
# n:忽略修改
# q:退出当前命令
# a:添加修改
# d:放弃修改
# /:通过正则表达式匹配修改内容
# ?:查看帮助信息

git add -u # 直接进入交互命令中的update模式
# 它会先列出工作区 修改 或 删除 的文件列表
# 新增 的文件不会被显示
# 在命令行 Update>> 后输入相应的列表序列号表示选中该项,回车继续选择
# 如果已选好,直接回车回到命令主界面

git add --ignore-removal . # 添加工作区 修改 或 新增 的文件列表, 删除 的文件不会被添加
diff
git diff 本身只显示尚未暂存的改动,而不是自上次提交以来所做的所有改动。
git diff # 比较暂存区和工作区
git diff --staged [<path>...] # 比较暂存区和最新本地版本库
git diff HEAD [<path>...] # 比较工作区和最新本地版本库,如果HEAD指向的是master分支,那么HEAD还可以换成master
git diff <commit-id> [<path>...] # 比较工作区和指定commit-id的差异
git diff --staged <commit-id> [<path>...] # 比较暂存区和指定commit-id的差异

git diff <commit-id> <commit-id> # 比较两个commit-id之间的差异

git diff <branch1> <branch2> # 显示两个分支之间所有有差异的文件的详细差异
git diff <branch1> <branch2> --stat # 显示两个分支之间所有有差异的文件列表
git diff <branch1> <branch2> <file> # 显示指定文件的详细差异
rm
git rm [<文件名> | 正则表达式] # 从工作区和暂存区移除文件同时添加变动到暂存区
git rm -f [<文件名> | 正则表达式] # Force
git rm -r [<文件夹名> | 正则表达式] # 非空文件夹
git rm --cached [<文件名> | 正则表达式] # 保留硬盘上的文件, 从git上删除
mv
commit
git commit -m "描述信息"
git commit -m -a "描述信息" # 跳过`git add`
git commit -m '第一行提交原因'  -m '第二行提交原因' # 多行

git commit --amend # 如果自上次提交以来还未做任何修改,那么快照会保持不变只修改提交信息
git commit --amend -m '提交原因'
git commit --amend --no-edit
git commit --amend --reset-author
# The --amend option to git commit is roughly equivalent to performing `git reset --soft HEAD^`, followed by fixing the files needed and adding those to the staging area.

git commit -C HEAD # 提交到HEAD

git commit --allow-empty
notes
A Git note is essentially an extra
refs/notes/commitsreference in Git
reset
不加选项地调用
git reset并不危险 — 它只会修改暂存区域
git log
git reset --hard <commit> # 回滚至之前的版本
# 自从 <commit> 以来在工作区中的任何改变都被丢弃,并把 HEAD 指向 <commit>
git reset --hard HEAD^ # 回滚一次提交
git reset --soft <commit>
# 暂存区和工作区中的内容不作任何改变,仅仅把 HEAD 指向 <commit>
git reset --mixed <commit>
# --mixed 是不带参数时的默认参数,它退回到某个版本,保留文件内容,回退提交历史

git reflog
# 可以查看所有分支的所有操作记录(包括commit和reset的操作、已经被删除的commit记录
# 跟 git log 的区别在于它不能查看已经删除了的commit记录
git reset --hard 版本号 # 回滚至之后的版本

git reset HEAD~1 # 回滚至HEAD的父提交, can be applied to undo Merges
restore
Branching and Merging
branch
git branch # 查看分支
git branch -a # 查看本地版本库和远程版本库上的分支列表
git branch -r # 查看远程版本库上的分支列表,加上 -d 参数可以删除远程版本库上的分支
git branch -vv # 查看设置的所有跟踪分支,这会将所有的本地分支列出来并且包含更多的信息,如每一个分支正在跟踪哪个远程分支与本地分支是否是领先、落后或是都有

git branch --merged # 查看哪些分支已经合并到当前分支
git branch --no-merged # 查看所有包含未合并工作的分支

git branch <分支名> # 创建分支
git branch -d <分支名>[ <分支名2> ..] # 删除分支
git branch -D <分支名>[ <分支名2> ..] # 强制删除

git branch -u origin/<分支名> <本地分支名> # --set-upstream-to
# 设置已有的本地分支跟踪一个刚刚拉取下来的远程分支,或者想要修改正在跟踪的上游分支
# 当设置好跟踪分支后,可以通过 @{upstream} 或 @{u} 快捷方式来引用它。
# 所以在 master 分支时并且它正在跟踪 origin/master 时,如果愿意的话可以使用 git merge @{u} 来取代 git merge origin/master。

git branch --move | -m bad-branch-name corrected-branch-name # 重命名分支

git branch --edit-description <description>
# 用`git config --get branch.<branch_name> description`来获取分支描述

git branch --contains <commit_hash>
checkout
git checkout <分支名> # 切换到分支

git checkout -b <分支名> # 创建分支同时切换过去
git checkout -b <分支名> <指向对象> # 指向对象可以是分支名也可以是Hash值
git checkout --orphan <分支名>
# 创建一个全新的,完全没有历史记录的新分支,但当前源分支上所有的最新文件都还在
# 但这个新分支必须做一次 git commit 操作后才会真正成为一个新分支

git checkout <tag> # 切换Tag
git checkout origin/<分支名> # 远程仓库的命名规范: <远程仓库名>/<分支名>
git checkout -b <本地分支名> --track origin/<分支名> # 在本地创建分支追踪远程的分支

git checkout -- <file> # 撤销修改, 丢失所有本地修改
switch
git switch <branch>
git switch -c <new-branch> # --create
git switch - # Return to previously checked out branch
log
git log
git log --status # 简要信息

git log -p -<n> # --patch, 最近n次的差异
git log --[since|until]=2.weeks # 可以使用相对日期(多少小时以前之类)和绝对日期
git log --[before|after]="2020-01-01" # 可以使用相对日期(多少小时以前之类)和绝对日期
git log <ID>..[HEAD | ID] # 从提交ID到HEAD或其他提交ID之间的记录

git log --pretty=[oneline|short|full|fuller]
git log --pretty=format:"格式化字符串"
git log --pretty=format:"格式化字符串" --graph

git log -- path/to/folder/or/file # 任何`--`之后的字符串都被当做文件名,之前的字符串被当做分支或其他选项
git log -- '*.py'

git log -S <searchTarget> --one-line

git log --oneline --graph --decorate --all # 打印提交图

git log master..experiment # 查看 experiment 分支中还有哪些提交尚未被合并入 master 分支
git log origin/master..HEAD # 查看在当前分支中而不在远程 origin 中的提交

git log -1 --dirstat
git log -1 --dirstat=lines
| Specifier | Description of Output |
|---|---|
| %H | Commit Hash |
| %h | Abbreviated commit hash |
| %T | Tree hash |
| %t | Abbreviated tree hash |
| %P | Parent hashes |
| %p | Abbreviated parent hashes |
| %an | Author name |
| %ae | Author email |
| %ad | Author date |
| %ar | Author date, relative |
| %cn | Committer name |
| %ce | Committer email |
| %cd | Committer date |
| %cr | Committer date, relative |
| %s | Subject |
merge
git merge <分支名> [<分支名2> ..] # 合并分支

git merge --squash
# 将待合并分支上的 commit 合并成一个新的 commit 放入当前分支
# 适用于待合并分支的提交记录不需要保留的情况

git merge --no-ff
# 默认情况下,Git 执行"快进式合并"(fast-farward merge)会直接将 Master 分支指向 Develop 分支
# 使用 --no-ff 参数后,会执行正常合并,在 Master 分支上生成一个新节点,保证版本演进更清晰

git merge --no-edit
# 在没有冲突的情况下合并,不想手动编辑提交原因,而是用 Git 自动生成的类似 Merge branch 'test' 的文字直接提交

git merge <branch_name> --no-ff --edit --quiet
#  use the --quiet flag to minimize the output and --edit to allow us to edit the commit message
tag
Tag并不会随着新的提交而移动。你也不能检出到某个标签上面进行修改提交,它就像是提交树上的一个锚点,标识了某个特定的位置
Git 使用两种主要类型的标签:轻量标签(lightweight)与附注标签(annotated)。
- 一个轻量标签很像一个不会改变的分支 - 它只是一个特定提交的引用。
- 附注标签是存储在 Git 数据库中的一个完整对象。 它们是可以被校验的;其中包含打标签者的名字、电子邮件地址、日期时间;还有一个标签信息;并且可以使用 GNU Privacy Guard (GPG)签名与验证。
- 通常建议创建附注标签,这样可以拥有以上所有信息;但是如果只是想用一个临时的标签,或者因为某些原因不想要保存那些信息,轻量标签也是可用的。
git tag # listing existing tags
git tag -l "v1.2.*" # 可以使用通配符

git tag <Tag名> [node] # 创建轻量标签,如果不提供node则使用HEAD指向的位置
git tag -a <Tag名> -m 'message' [node] # --annotate, 创建附注标签
git tag -d <Tag名> # 删除Tag

git push origin --tags # 将本地Tag信息推送到远程仓库
git pull origin --tags # 更新本地Tag版本信息

git show <Tag名>
stash
git stash           # 将未提交的文件保存到Git栈中
git stash list      # 查看栈中保存的列表
git stash show stash@{0} # 显示栈中其中一条记录

git stash push -m "message"

git stash apply
git stash apply stash@{index} # 从Git栈中检出其中一条记录,但不从栈中移除

git stash drop stash@{index}      # 移除栈中其中一条记录
# In Powershell, "{" and "}" need to be escaped with "`"

git stash pop
git stash pop stash@{index} # stash pop = stash drop + stash apply

git stash clear  # 清空栈里的所有记录

git stash branch <newBranchName> # 把当前栈中最近一次记录检出并创建一个新分支

git stash create # 为当前修改或删除的文件创建一个自定义的栈并返回一个ID,此时并未真正存储到栈里

git stash store <ID>
# 将 create 方法里返回的ID放到 store 后面,此时在栈里真正创建了一个记录,但当前修改或删除的文件并未从工作区移除
Inspection and Comparison
describe
git describe <ref> # <ref> 可以是任何能被 Git 识别成提交记录的引用,如果你没有指定的话,Git 会以你目前所检出的位置(HEAD)

# 输出的结果是这样的:
#   <tag>_<numCommits>_g<hash>
#       * tag 表示的是离 ref 最近的标签
#       * numCommits 是表示这个 ref 与 tag 相差有多少个提交记录
#       * hash 表示的是你所给定的 ref 所表示的提交记录哈希值的前几位。
# 当 ref 提交记录上有某个标签时,则只输出标签名称
shortlog
Patching
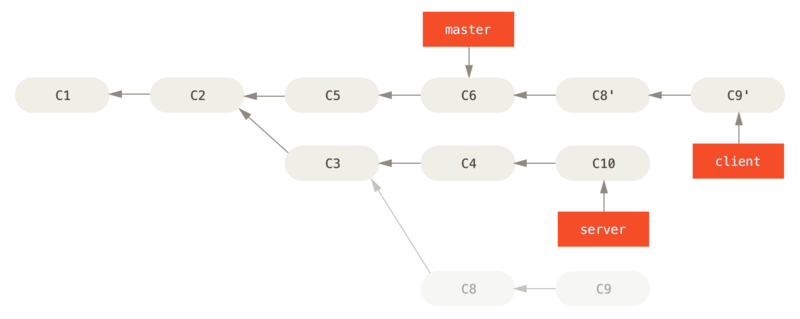
rebase
rebase 实际上就是取出一系列的提交记录,“复制”它们,然后在另外一个地方逐个的放下去 rebase 的优势就是可以创造更线性的提交历史
git rebase <分支名> # 把当前分支的工作移到别的分支
git rebase -i HEAD~4 # 在交互式编辑(如vim, VSCode)中提交记录
# p, pick <commit> = use commit
# r, reword <commit> = use commit, but edit the commit message
# e, edit <commit> = use commit, but stop for amending
# s, squash <commit> = use commit, but meld into previous commit
# f, fixup <commit> = like "squash", but discard this commit's log message
# x, exec <command> = run command (the rest of the line) using shell
# b, break = stop here (continue rebase later with 'git rebase --continue')
# d, drop <commit> = remove commit
# l, label <label> = label current HEAD with a name
# t, reset <label> = reset HEAD to a label
# m, merge [-C <commit> | -c <commit>] <label> [# <oneline>]
git rebase --interactive --exec "git commit --amend --reset-author"
git rebase -i --autosquash

git rebase <基准分支名> <移动分支名> # 把移动分支名移动到基准分支名下
--onto


revert
Revert can be used to undo a commit in history that has already been published (pushed), whereas this can't be done with the amend or reset options without rewriting history.
# 撤销某次操作,此次操作之前和之后的 commit 和 history 都会保留,并且把这次撤销作为一次最新的提交
git revert HEAD # 撤销前一次提交操作

git revert HEAD --no-edit # 撤销前一次提交操作,并以默认的 Revert "xxx" 为提交原因

git revert -n HEAD
# 需要撤销多次操作的时候加 -n 参数,这样不会每次撤销操作都提交,而是等所有撤销都完成后一起提交

git revert master~6..master~2
cherry-pick
Administration
archive
# 将加了tag的某个版本打包提取
git archive -v --format=zip v0.1 > v0.1.zip
# --format 表示打包的格式,如 zip
# -v 表示对应的tag名,后面跟的是tag名
reflog
Git 会在后台保存一个引用日志(reflog)记录最近几个月的 HEAD 和分支引用所指向的历史
The reflog command stores information on updates to the tip of the branches in Git, where the normal git log command shows the ancestry chain from HEAD, and the reflog command shows what HEAD has pointed to in the repository.
Basically, anything that makes HEAD point to something new is recorded in the reflog
git reflog
4d047fc (HEAD -> master, origin/master) HEAD@{0}: commit: 重新组织内容结构+添加内
容
01c3278 HEAD@{1}: commit: 补充@规则和继承相关的内容
01fdec2 HEAD@{2}: commit: 补充Git基本原理(part1)
3e4d96b HEAD@{3}: commit: 补充Registry的分类
f0d4d00 HEAD@{4}: commit: 新增文件,准备整理出来
ddb581d HEAD@{5}: commit: 更改配置文件格式为yaml, 删除VSCode中设置的内容(已经自带
对TypeScript的支持)
dfab469 HEAD@{6}: pull --tags origin master: Fast-forward
每当HEAD 所指向的位置发生了变化,Git 就会将这个信息存储到引用日志这个历史记录里。 通过这些数据可以很方便地获取之前的提交历史。 如果想查看仓库中 HEAD 在五次前的所指向的提交可以使用 @{n} 来引用 reflog 中输出的提交记录。
fsck
The fsck command tests the object database and verifies the SHA-1 ID of the objects and the connections they make. This command can also be used to find objects that are not reachable from any named reference, as it tests all the objects found in the database, which are in the
.git/objectsfolder.
gc
Moving on the Tree
HEAD
cat .git/HEAD # 查看HEAD指向
git symbolic-ref HEAD # 如果HEAD指向一个引用,查看其指向
git checkout <node的哈希值> # 移动HEAD的指向
相对引用
# 操作符 (^): 把这个符号加在引用名称的后面,表示让 Git 寻找指定提交记录的父提交
# 如果跟数字, 表示在两个父节点时的另一个
git checkout main^ # 移动到main的父节点
git checkout main^^ # 移动到main的第二个父节点

git checkout <node的哈希值>
git checkout HEAD^ # 将HEAD作为相对引用的参考


# 操作符(~): 该操作符后面可以跟一个数字(可选,不跟数字时与 ^ 相同,向上移动一次),指定向上移动多少次
git branch -f main HEAD~3 # 将 main 分支强制指向 HEAD 的第 3 级父提交

# `~`和`^`可以链式使用
Sharing and Updating Projects
fetch
git fetch 完成了仅有的但是很重要的两步:
1.从远程仓库下载本地仓库中缺失的提交记录
2.更新远程分支指针(如 origin/master)
git fetch实际上将本地仓库中的远程分支更新成了远程仓库相应分支最新的状态。
git fetch通常通过互联网(使用 http:// 或 git:// 协议)与远程仓库通信。
git fetch并不会改变你本地仓库的状态。它不会更新你的 main 分支,也不会修改你磁盘上的文件。
可以将git fetch的理解为单纯的下载操作
git fetch # 下载所有的提交记录到各个远程分支
git fetch <remote> <分支名>
git fetch <remote> <source>:<destination> # destination分支不存在时会创建
git fetch <remote> :<分支名> # 在本地创建一个新分支

git fetch <remote> refs/notes/commits:refs/notes/commits

git fetch --prune
pull
git pull==git fetch+git merge
push
git push不带任何参数时的行为与 Git 的一个名为push.default的配置有关,它的默认值取决于你正使用的 Git 的版本
git push
git push <remote> <place>
git push origin <source>:<destination>
# 删除远程仓库中的分支
git push origin :<分支名>
git push origin --delete <分支名> [<分支名2> ..]

git branch --move master main # 重命名远程仓库的主分支名
git push --set-upstream origin main
git push origin --delete master

git push <remote> tag <tag name>
git push <remote> --tags

git push <remote> refs/notes/commits
remote
git remote
git remote -v

git remote add <shortname> <URL>
git remote show origin
git remote rename name_from name_to
git remote remove <remote>

git remote set-head <remote> <branch> # 设置默认分支

git remote prune origin
“origin” 并无特殊含义
远程仓库名字 “origin” 与分支名字 “master” 一样,在 Git 中并没有任何特别的含义一样。 同时 “master” 是当你运行
git init时默认的起始分支名字,原因仅仅是它的广泛使用,“origin” 是当你运行git clone时默认的远程仓库名字。 如果你运行git clone -o booyah,那么你默认的远程分支名字将会是booyah/master。
Create a Git repo base on windows shared folder
pushd \\remoteServer\git\Share\Folder\Path
mkdir MyGitRepo1
cd MyGitRepo1
git init --bare

# Back to local repository
popd
git remote add origin //remoteServer/git/Share/Folder/Path/MyGitRepo1  # using `/` rather than `\` in uri
git push origin --all
Plumbing Commands
ls-tree
Git SVN
To clone repository from SVN
To pull in new commits from SVN
To ignore changes of something
To push local commits into SVN
GitHub
Fork
如果你想要参与某个项目,但是并没有推送权限,这时可以对这个项目进行“派生”。 派生的意思是指,GitHub 将在你的空间中创建一个完全属于你的项目副本,且你对其具有推送权限。
在以前,“fork”是一个贬义词,指的是某个人使开源项目向不同的方向发展,或者创建一个竞争项目,使得原项目的贡献者分裂。 在 GitHub,“fork”指的是你自己的空间中创建的项目副本,这个副本允许你以一种更开放的方式对其进行修改。